


Hello and welcome to Whimsberry and our third sewing tutorial! With Christmas fast approaching, we have decided on an easy to sew scrunchie tutorial for simple holiday gift giving. This tutorial is very simple and easy to follow for any level sewer from the very beginner to the advanced.
We have made the tutorial with a 100% cotton fabric, which is very easy to sew with. Below are a few photos of different fabrics and widths for this project. All of the scrunchies below were made using a 22" length.


For this sewing project, you will need the following:
- Fabric (22" x 4-6")
- Elastic (1/4" or 1/2" X 7-7.5")
- Safety pin (medium or large)
- Thread
- Pins
- Sewing machine
- Scissors
- Cutting and Rotary tool (only needed if you have them already)


To begin, fold your fabric in half to make it easier to cut. You will want to cut out a panel that is 22" long and between 3" and 5" wide.


For this tutorial, I have chosen to make the panel 5" wide. That will make a bigger scrunchie, that is easier to pull through for your first. When making these as gifts, I tend to make them 3"-4" wide depending on the fabric. Feel Free to play around with the width and length for future scrunchies, as it greatly changes the fullness and look of the item. Scroll back up to the first photos to see what the different widths will make.


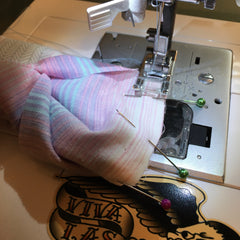
Fold the fabric lengthwise (face to face), and start sewing 2-3" down from the top. Sew a 1/4" or 3/8" (depending on what you are comfortable sewing) that ends 2-3" from the bottom edge.


Next you are going to want to turn the tube right side out. To do this, you will use a larger safety pin. Run the safety pin through the edge of the fabric and lead it through the tube slowly. As you inch your way down, you will be able to pull the fabric through its self, eventually turning the whole thing right side out.


Once the fabric is right side out, you will want to match the open edges together (face to face), and sew along the edge using the same 1/4" or 3/8" seam that you used for the edge.

See photos if my description is confusing.


After that seam is finished, it will easily move inside the circular tube of the scrunchie, leaving a small hole in the side. Next, cut a 7-7.5" piece of 1/4" or 1/2" elastic. To check the sizing, you can wrap it around your wrist. It should fit lightly with a 1/2-3/4" overlap.


Slide your safety pin through the end of the elastic, and run it through the scrunchie. You will want to make sure that you keep a hold of the end of the elastic.

When it is through, pull the elastic out both ends and pin ends together at a 1/2-3/4" overlap.


Sew this overlap using a straight stitch, criss-cross stitch, or both. I like to do a little bit of both. It's not pretty, but this step does not have to be perfect, and chances are you are the only person that will be seeing it.


Next, crease the un-sewn edges to follow where the seam would be on the edge and pin the hole closed with the sewn elastic inside. Make sure that you line up the edges as close as possible so that you don't miss an edge in the next step.


The last step is to sew the hole closed. You will want to sew this seam as close to the edge as you are comfortable, and make sure that you are sewing through both sides of the scrunchie. It is best to use a thread that matches your fabric in this step so that this final seam is not as visible.

Once this seam is done, so is your first scrunchie! Congrats! Give it a good squish, scrunch it on up, and throw it up in your hair! Now that you have your first one complete, I recommend making a few more at different widths to see what your favorite style ends up being. Above you will see a photo of a 3" width, compared to a 5" width. They are very different scrunchies!

If you are following this tutorial for the Whimsberry sewing challenge, that challenge will be open starting on 11/08/20, and available for two weeks time. The photo above shows the scrunchies that I made for the challenge. I will be giving them away to one of you after the close of the contest. If you completed the Whimsberry sewing challenge, please take a photo of your finished project and post it to your Instagram feed or stories! Make sure you tag us @whimsberry in the post so that we are notified and you will be automatically entered into the giveaway!! Please also feel free to use the hashtag #whimsberrychallenge in any related photos! We want to see any of your progress in this challenge.
The second Whimsberry sewing challenge ends Sunday November 22, 2020 @ 10:00pm MST and the winner will be drawn and announced on Monday, November 23, 2020 @ 10:00am!
Good luck to all of you sewers out there! I cannot wait to see the wonderful fabrics that you choose to make your Whimsberry scrunchies with! Feel free to message me on Instagram if you have any questions!
Happy Sewing to all of you, I cannot wait to see what you sew up!
Miss. Whimsberry - The Pinup Seamstress